Showing posts with label experiments. Show all posts

Sunday, August 4, 2013

Mini Mary Anning

Miss L loves her dinosaurs.  She also loves her dolls.  And she very, very much loves to have her dolls play paleontologist. 

So, bright idea...outfit her dolls as her favorite lady paleontologists!  Sadly, American Girl does not yet have a line of famous historical scientists.   (But get on that, AG, seriously.) The remedy?  My sewing machine! 

Meet Mary Anning:


To refresh your memory, Mary Anning was a 19th-century woman who lived on the coast of England.  As a girl, she would explore the cliffs with her fossil-collecting father.  She went on to discover the ichthyosaur and become an influential early paleontologist, despite the boy's club of the time. There are many good books about Anning, including the novel Beautiful Creatures by Tracy Chevalier, one of our favorite children's storybooks, Rare Treasure by Don Brown, and an early-reader book Miss L has attacked many times, The Dog That Dug For Dinosaurs by Shirley Raye Redmond.
 
I used the illustrations in Don Brown's book and a famous portrait of Anning as my inspiration for our doll outfit. 
 

The cape pattern was from McCall's M6526, with the overskirt from McCall's 2609.  These were my very first doll garments!  Encouraged by how the cape and overskirt turned out, I turned to the dress itself, another 2609 pattern, modified a little to be more like the simple dress a poor woodworker's daughter would be likely to have, and more like the girl's dress shown in Don Brown's illustrations. 


OK, WAY harder, all those little curves and gathers.  I'm glad our model Saige here doesn't complain much about seam puckers and fraying.  Good sport, that one. You can't see her books or petticoats here, but we just borrowed some from another AG historical doll outfit (Caroline's winter boots and her underthings).  The bonnet was found cheap on etsy, I added the red ribbon. 
 
 
And the crowning touch, of course, is the little doll-size hammer!  An inexpensive little jeweler's hammer. 
 
This was a challenge but I learned some new sewing skills...and Miss L loves it, so we will probably need more paleontologist and science-lady outfits!  For all my googling, I don't see any to purchase available, so looks like it is on me to fill the void.  Next on the docket are Sue Hendrickson and maybe Marie Curie.  Who else would be on your must-list?

Monday, March 18, 2013

They Leave a Mark on You

Not too long ago, a friend forwarded me an article about cave paintings.  Not just any cave paintings, but 13,000-year-old cave paintings in France.  Not just any 13,000-year-old French cave paintings, but a cave chamber full of 13,000-year-old French cave paintings that appear to have been made by children. 

Whoa. 


And people have been leaving their mark on the world ever since.  Most of our marks will be lost to time, are mere chicken scratches in the dirt.  I suspect our modern impulse to blog and facebook comes from a similar instinct as the one that drove the ancients to draw pictures of animals on rock walls. 


I started these negative outlines of my kids' hands after stewing on similar ideas and Aboriginal hand stencils.  Dang, these kids grow fast.  Their hands are already much bigger than the outlines.


So these photos now join my other scratchings on the walls of the internet.   Positive and negative effects on the world and those closest to us, dark and light.


Or maybe I should leave the philosophizing for the philosophers and just enjoy the pretty blue beads.  Oooo, shiny!

Sunday, February 6, 2011

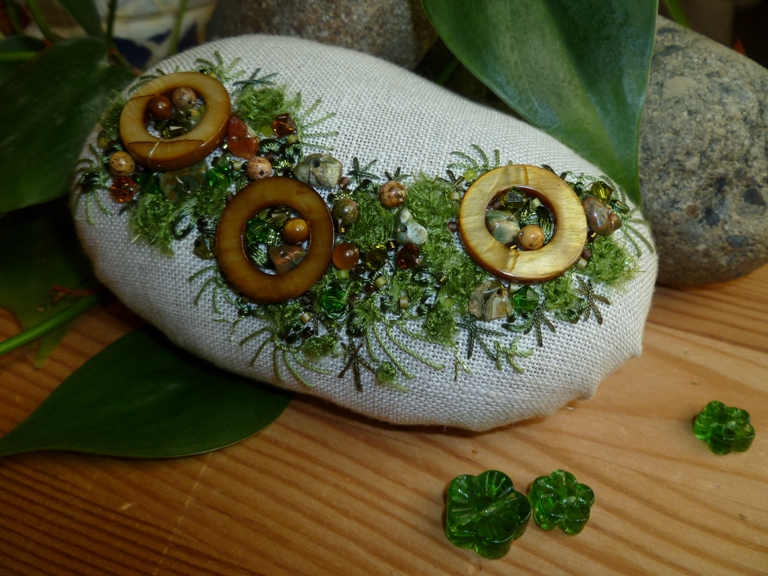
It must not be a rolling stone...

Because look at all the moss it gathered!


Next time I do this I will use a darker gray ground linen, to be more like real stones.

Lots of fun though and totally "organic" in feel.  It's not "organic" in materials though, I love the effect of the varied texture synthetic fibers. 


I used Rainbow Gallery "Fuzzy Stuff" in a buttonhole wheel stitch to make the fuzziest parts, you can see one pretty well in the center of the above photo. 


Wouldn't it be cool to mass a bunch of these together in a "rock garden"?

Friday, February 4, 2011

Sprout!

This little green adventure is done. 


Cute, I think.  It's not exactly what I was going for, but I can always try again.


And I do really like the way the tiny little green flowers (or bugs) turned out.


OK, back to work!  There are not enough hours in the day, I fear...

Sunday, January 30, 2011

Stand back. Work in progress.

Sometimes I think I do these projects just for the pleasure of mixing the pretty ingredients. 


At this stage, the WIP box is still prettier than the WIP.


But maybe not for much longer. 

Friday, January 14, 2011

Forest, Finished!

The Grand Unveiling:


Done!  Yay!  This is one of those rare stitched pieces that really can't be considered complete until the framing is complete, too.


This forest is DK Designs' "Enchanted Forest" brazilian embroidery design, using the recommended EdMar threads.  But what I liked best about it was the freedom, she lists the stitches used and the approximate placement, but it is really up to your own eye where you put them precisely.  My version is really pretty different from the photo of the model included with the instructions.

EdMar threads are rayon, with a "z-twist", which is backwards to the twist of most other threads, so they can be slippery and tricky to work with.  However, they are really tough and you don't need to be afraid to use a lot of force on the bullions and other tough stitches.


A few really fun things I hadn't tried before were what attracted me to this design.  The first was the use of Shiva Paintsticks to create the background image on which to stitch.  The other is the use of actual rocks attached to the work.  How was that done?  Look closely at the rocks below and see if you can figure it out.


Fun, huh?


I am really glad I did this piece, it was a great learning piece and stretched my skills.  My perfectionist brain knows where I would have done a few things differently, but I mostly did it for the experience, anyway.  I'm itching to work on one of my own original designs again now, which is really cutting down on progress for my older WIPs, but that's just the way the cookie crumbles. 

Saturday, December 18, 2010

A Fantasy Garden in Copper and Navy

My second December finish! 


I loved putting this one together.  The colors are delish, and the variety of stitches I chose kept it interesting, and of course the BLING.  All pictures are clickable to a larger version.


The general outline was from an antique drawing of an I-don't-know-what (jellyfish?) in Dover's "Ornamental Forms from Nature".  I love that book but really wish they'd label the artwork.   The orientation of the what's-it in the book is the other way around, like this:


Materials used include Vikki Clayton HDF silk floss in "Primitive Barn Rust" and "Motes of Night", DMC cotton floss and perle, Rainbow Gallery metallic threads, a variety of beads including Swarovski pearls and bicones, Delica seed beads, sequins, mirrors, and jewelry spacers.


Stitches used include Shisha, buttonhole, star, cross, chain stitch, straight stitch, stem stitch.

If the sun ever comes out again, I will take truer-color pictures.  But I just couldn't wait to show it to you!


Wednesday, November 17, 2010

Shimmering Shisha

I LOVE shisha mirror embroidery and the shisha stitch.  This little fob was my first Shisha (and goldwork) project several years ago, the pattern was from an old issue of an Australian magazine and it took me a long time to track down the materials.  It's a little worse for wear these days and part of me wants to make another one because I know I could do it better, now.


I'm putting a few on as impact/accent on my new freestyle project, which will remain nameless for the time being.  But I love these little shishas so much thought I'd share a hint of them now.


Attaching Shisha mirrors using Shisha stitch is simple, but a little fiddly and does take practice.  If you're interested in Shisha, the best instructions I've found are in select back issues of my favorite magazine, Stitch with the Embroiderer's Guild out of the U.K. (linked above), or in the hard-to-find book Sadi Thread & Shisha Glass Embroidery by Betty Luke. 

In other news I can not wait for my other camera to be repaired and sent back to me, this old one is that much more difficult to focus and take true color pictures, and eats AA batteries by the handful. NOM NOM.

Friday, October 29, 2010

Ocean Jasper

I stayed up late last night and did all the french knots and beading!


This little piece was inspired by a small polished stone in my collection and wonderful close-up photograph of a section of ocean jasper from the fabulous book Within the Stone by Bill Atkinson.


This was a fun, quick stitch.  These little freestyle pieces, where I get a bee in my bonnet and can't stitch anything else until the idea gets OUT, are very satisfying for me.


Used DMC memory thread, HDF silk floss and ribbon, Rainbow Gallery and mystery grab bag specialty fibers, gold Swarovski pearls, and several sizes and colors of glass seed beads, on black Lugana.


I stitched it with the bands vertical and originally thought that it would be oriented like this:

But now I think I like the finished product with the bands horizontal instead, it's kind of like a mysterious ocean landscape this way:


OK, back to work!  The girl has a Halloween party, gotta go, enough playing for now...

Wednesday, October 27, 2010

The sad tale of the unfinished algae pool quilt

When I was looking for the muslin the other day I uncovered this:

"What the heck is that?" you ask.  Appropriate question.  A few years ago I took a three-day art quilting design class with Ann Johnston.  It was a good class and I learned a few quilting techniques, and had some good exercises on the value of line and shape in fabric design.  She asked us to bring some of our own favorite photos to use as inspiration.  This was one of the ones I chose:


"What the heck is that?" you ask, again.  Apologies for the photo quality, it was taken in the BDC (before digital camera) era with a really cheap 35mm point and shoot.  Remember how film used to be expensive and you'd only take one or two shots of something, rather than 30 and pick the best?  Anyway I digress.  This is algae growing near the edge of a Yellowstone hot spring.  You better bet that next time I get back to Yellowstone I'm taking a couple extra SD cards for a few thousand photos.  Anyway...

Our project on the last day of the class was to use what we'd learned in the class to make a small quilt based on one of our photos.  I chose to simplify the bright colors of the algae and try to capture the movement of the water. 


I actually still really like this quilt.  When I got it home I continued the quilting lines within the central area and started quilting the lighter green. 


But I kept breaking threads and needles, no matter what I tried.  That is when I realized something very, very important.  This quilt was made using reverse applique of several layers of fabric.  I did not trim away the excess underneath layers, the other people in the class said that probably wasn't necessary and the extra layers would create a firmness that would be an interesting effect in the finished product.  What I failed to realize was that I, as the youngest and poorest member of the class, was using an entry-level basic Kenmore sewing machine, everyone else was using fancy Berninas and whatnot.  And when free-motion quilting, my basic Kenmore can't handle more than three or four layers (fabric, batting, fabric) in the quilt sandwich. 

So lessons learned:
1) know your machine
2) think about the advice of others, if it will really work for you, and
3) if I'm serious about this quilting thing, invest in a better machine.

But today I'm still using the basic Kenmore.  It does still work well for most general applications.  And because of space restrictions I'm not going to be doing large quilts anyway so now I just have to be careful about how I construct the smaller things, most of my work is done by hand anyway. 

So that's the end of the tale, for now, at least.  I still rather like this unfinished little beast, and if I ever do upgrade my machine, I think finishing this little quilt will probably be how I learn the new machine's quirks. 

Sunday, October 24, 2010

First Redwork Experiment

Thanks to a challenge over on Stitcher's Showcase, I've tried my first semi-traditional redwork piece.  Cute!  Click the photo for a closer look.


The pattern is one of the wonderful patterns from The Floss Box "Science" series.  The red thread is a one-off "detritus" silk floss from Hand Dyed Fibers on plain off-white muslin. Stitches used included stem stitch, back stitch, couching, lazy daisies, french knots, and tailed french knots.

Quick to stitch up and I love the little flowers.


And the buggies!


Happy Sunday everyone!

Tuesday, September 28, 2010

Landscapes in the Fall

No, not necessarily the colorful foliage of Autumn...but when it turns damp and colder outside this time of year, my stitching habits tend to turn slightly toward two things:  Christmas ornaments, and quilts. 

I am not a good traditional quilter...putting things together using straight lines is apparently not my strength.  I tend toward small applique, like Hawaiian quilts, geometric art quilts, and landscapes.  All my little quilt experiments must be small, sadly, because of space restrictions. 

This was my first ever landscape quilt, it's about 5x8.  Don't look too close at the poor machine stitching!  It was my first attempt at free-motion stitching on my inexpensive Kenmore sewing machine.  I should have practiced more, but frankly, I'm still not that much better at it. 


I was looking vacation photos yesterday and thinking it's time for more landscapes.  These books are my favorites on the subject, and it's Valerie Hearder's titles that got me started in these.


So I think I'll pull out my little stash of fabrics later today and see how I can interpret some of my favorite places.  I'll let you all see what I work out!

Bryce Canyon, June 2010
Zion National Park, June 2010
Washington Coast, March 2009
East foothills of the Cascade Mountains, July 2009